Floorplanner Tools for Designers: Uses, Features, Installation and Others

What is the Floorplanner Tool In SketchUp?
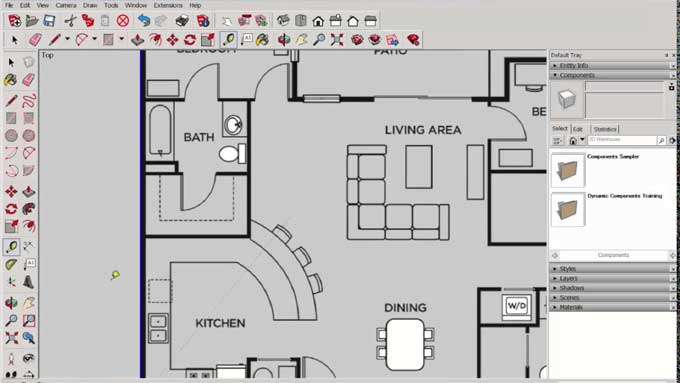
The SketchUp Floorplanner tool allows users to develop and design comprehensive floor plans for architectural and interior design projects. It is a strong tool for visualising and laying out areas within a building. Users may use the Floorplanner tool to draw walls, specify room size, add doors and windows, and even include furniture and fixtures to create a realistic floor plan.
The Floorplanner Tool in SketchUp is a 2D drawing tool that allows you to create floor plans. It is a free tool that is available to all SketchUp users. The Floorplanner Tool has a number of features that make it easy to create floor plans.
The application provides several customization possibilities, allowing users to edit and improve their floor plans to meet their individual design needs. Whether you are an architect, interior designer, or house owner, SketchUp's Floorplanner tool makes it simple to bring your design ideas to reality.
How to install the Floorplanner Tool in SketchUp?
The Floorplanner tool is not a native tool within SketchUp. However, you can still create detailed floor plans in SketchUp using its built-in tools and features. Here is a step-by-step guide on how to create floor plans in SketchUp:
1. Launch SketchUp: Open SketchUp on your computer. If you don't have SketchUp installed, you can download it from the official SketchUp website and install it following the provided instructions.
2. Set up the workspace: Once SketchUp is open, customize your workspace by arranging the toolbars and panels to your preference. You can access the necessary tools from the default toolbars like the Drawing, Modify, and Entity Info toolbars.
3. Start drawing the floor plan: Begin by selecting the Line tool from the toolbar or by using the keyboard shortcut "L." Use this tool to draw the outline of the walls of your floor plan. Click at each corner of the room, and SketchUp will automatically create edges to connect them.
4. Adjust dimensions: To define the dimensions of your walls, select the Tape Measure tool from the toolbar or use the keyboard shortcut "T." Measure the length of the walls by clicking on one corner and dragging the measurement line to the other corner. Enter the desired dimension and hit Enter to apply it.
5. Add doors and windows: Use the Rectangle tool or the Circle tool to draw the openings for doors and windows. You can specify the dimensions of these elements by using the same measuring techniques mentioned earlier. To create a door or window, draw a rectangle or circle, and then use the Push/Pull tool to extrude the shape to the desired depth.
6. Incorporate furniture and fixtures: To add furniture or fixtures to your floor plan, you can either create them from scratch using the native SketchUp tools or import 3D models from the SketchUp 3D Warehouse or other reliable sources. To import models, go to "File" > "3D Warehouse" > "Get Models" and search for the desired items.
7. Fine-tune your floor plan: Use the various editing and modification tools in SketchUp to refine your floor plan. You can adjust the position, size, and orientation of objects, as well as apply materials, colours, and textures to enhance the visual representation of your design.
8. Save your project: Once you are satisfied with your floor plan, save your SketchUp project by going to "File" > "Save" and choosing a location on your computer to store the file. You can also export your floor plan in various file formats, such as PDF or image formats, for sharing or printing purposes.
What are the features of the Floorplanner Tool in SketchUp?
The Floorplanner Tool has many different types of features. Here are some features of SketchUp that can be helpful for floor planning:
1. Drawing Tools: SketchUp provides a variety of drawing tools such as lines, rectangles, circles, and polygons that allow you to create the basic shapes of rooms and walls.
2. Push/Pull Tool: This tool enables you to extrude 2D shapes into 3D objects, which can be useful for creating walls of different heights.
3. Measurements and Dimensions: SketchUp allows you to input precise measurements and dimensions, ensuring accuracy in your floor plans. You can also use the Tape Measure tool to measure distances within your model.
4. Components and Groups: You can create reusable components or groups of objects such as doors, windows, furniture, and fixtures. This way, you can easily place them in your floor plan and make changes more efficiently.
5. Layers: SketchUp's layer system allows you to organize different elements of your floor plan, such as furniture, walls, and annotations, into separate layers. This helps in better management and visibility control.
6. Materials and Textures: You can apply various materials and textures to surfaces, giving your floor plan a more realistic appearance. This is helpful for visualizing finishes and materials in different rooms.
7. 3D Navigation: SketchUp offers intuitive navigation tools for exploring your 3D floor plan, allowing you to orbit, pan, and zoom in and out to view your design from different angles.
8. Extensions: SketchUp has a wide range of extensions and plugins available in its Extension Warehouse, some of which are designed specifically for architectural and interior design. You may find extensions that provide additional features for floor planning purposes.
What are some of the advantages and disadvantages of the Floorplanner Tool in SketchUp?
Floorplanner Tool is a great option for anyone who needs to create a simple floor plan. It is easy to use and includes a number of features that make it a powerful tool. However, if you need to create complex floor plans, you may want to consider using a different 3D modelling software.
The following are some of the advantages and disadvantages:
Advantages
Easy to use: The Floorplanner Tool is very easy to use, even for people who have never used 3D modelling software before. The interface is simple and straightforward, and the tools are easy to understand.
Grid system: The Floorplanner Tool includes a grid system that helps you to accurately measure and place objects. This is especially helpful for creating complex floor plans.
Library of pre-made objects: The Floorplanner Tool includes a library of pre-made objects that you can use to add furniture, appliances, and other items to your floor plan. This saves you time and effort, and it allows you to create more realistic floor plans.
To learn more, watch the following video tutorial.
Video Source: SketchUp School
Export floor plans as PDF, JPEG, or PNG files: The Floorplanner Tool allows you to export your floor plans as PDF, JPEG, or PNG files. This makes it easy to share your floor plans with others or to use them in other applications.
Disadvantages
Only supports 2D floor plans: The Floorplanner Tool only supports 2D floor plans. This means that you cannot create 3D models of your space.
Not as powerful as some other 3D modelling software: The Floorplanner Tool is not as powerful as some other 3D modellings software, such as SketchUp Pro or AutoCAD. This means that it may not be suitable for creating complex floor plans or 3D models.
Can be difficult to create complex floor plans: The Floorplanner Tool can be difficult to use for creating complex floor plans. This is because the tools are not as powerful as those found in other 3D modelling software.